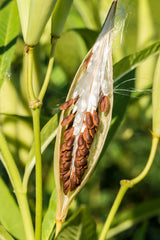
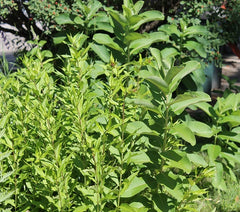
 Milkweed grows in a sturdy upright pattern with large leaves that turn from light green to dark green and sometimes to red as they mature. The plant can reach up to six-feet tall and produces a multi-clustered pinkish purple flower that is typically as large as a tennis ball and blooms throughout the summer, if regularly pruned. In addition to Monarchs, many other pollinators will visit these flowers so this plant does well if combined with other flowering plants. If leaves or stalks are broken, they ooze a white, milky substance which gives the plant its name. Large oblong seed pods eventually form with a hard husky shell and are often used in dried floral arrangements. When broken open, the silky seeds will float all over and can be a bit messy.
 Milkweed requires full sun, light soil, and can handle drier conditions once established. This plant is also perennial (assuming you choose a variety native to your region) and spreads rapidly through a rhizome or taproot growing out from the plant. Planting just a few plants this year will eventually help you establish a large patch over time and will require some cutting back if it outgrows your flowerbed. While Milkweed will not fit every landscape design, there are many ways to include this amazing plant in your garden. Be creative and put the plant’s tall, sturdy structure to use to complement other more delicate plants. Here are just a few ideas to get you started:
Cottage Garden Design
 The best and easiest way is to plant a cottage-style garden. These freeform gardens typically include hardy plants such as Hollyhocks, Tall Garden Phlox, Climbing Roses, and Daisies and it’s easy to tuck a few Milkweeds into that mix. As the summer goes, each plant will flower, inviting birds and butterflies from all over. Monarchs will feed from many different plants and you’ll most likely attract lots of other beneficial insects who’ll work hard to pollinate your garden or fruit trees.
Create a Corridor Rest Stop
Just a few plants placed together in a corner of your yard are enough to support quite a few Monarchs over the summer. Try a grouping around your mailbox or in an out-of-the-way strip such as along the back of your garage or near an alley. Because these plants are so hardy, you don’t have to worry about keeping them watered like many regular landscaping plants. And they’ll regrow from year to year so once you plant, you’ll always have milkweed for the Monarchs.
Go Big!
If you have a pasture, a roadside piece of land, or just an extra large backyard, consider building up a “native prairie” in your corner of the world. Start with lots of milkweed and add in other favorites pollinators such as Purple Coneflower or Black-Eyed Susans. Your local Extension office can help you pick out the right plants for your area, assist you to draw up a plan, and probably even help you source and buy the plants and seeds.
Get Milkweed for your garden here
Want to learn more about Monarchs? Click over to our article, “America’s Favorite Butterfly.”
.

 Monarchs are the only butterfly known to make a two-way migration. Most other butterflies are able to overwinter as larvae or pupae but Monarchs cannot survive the cold. Relying on environmental changes, they know when it’s time to head South and will travel between 50 and 100 miles per day, taking up to two months to reach their winter home in Mexico or Southern California. They start returning to the Southern U.S. in late February, making pit stops along the way to refuel and reproduce. Over the course of the summer and their travels, they will produce four generations of Monarchs, each one travelling further North. The fourth generation does not reproduce the first year and are the ones who travel to overwinter and restart the cycle in the Spring.
 Not all seed starter pots are created equal! Some like plastic or peat are hard on the environment while others are not so great for the seedlings. Luckily innovators have come up with a great alternative that’s friendly to the planet and tender seedlings.


 Just like people, garden vegetable plants grow best when they’re with friends! If you struggle with pests, critters, or even want a better crop, companion gardening can help! For instance, did you know that bee balm and mint planted near tomatoes will enhance the flavor?
  o, knowing your garden helps determine the problems that need fixing (for instance, not all gardens have trouble with cutworms). The easiest approach to companion gardening is to plant flowers and veggies in a haphazard way. No long rows, no big patches of one plant, just all jumbled together in your plot. This confuses insects and critters as they’re looking for their favorite treat and effectively camouflages plants from their enemies!
 Always wear gloves – all parts of the pepper are hot but the inside membranes and juices are the hottest. Even with gloves on, don’t touch your face, eyes, or nose. Keep milk on hand, too, as it will kill the burn much faster than water. Along with heat, each pepper has a unique flavor and color. Bell peppers have sweet and meaty flesh and are perfect for crunch and color; rubbed with olive oil and grilled whole; or sautéed and added to tomato sauce. Their sweet flavor and pretty colors only intensify if left on the vine to turn from green to yellow to orange to red. Chile peppers, too, come in a wide range of colors and the less hot versions can be made into lovely relishes, pickled with onions, or added to burgers or shishkabobs.


 The beauty you’ve worked so hard to create outdoors can easily be turned into gorgeous wall art, all for a fraction of the cost of decor store prints. And all you need is one good digital photo of the one-of-a-kind subject matter right outside your backdoor! Whether you have an expensive multi-lens camera or a simple smart phone, you can freeze frame that beauty with just a couple clicks. Getting a good shot doesn’t require advanced skills. Just remember these simple garden photography basics:
 Take your time. Spend a chunk of time watching the activity in your garden and you’ll eventually notice birds, butterflies, and bees that stop by. These make great shots – just use your “sports” mode and snap a bunch as they flit around the blooms. (And by the way, sitting in your garden is a great stress reliever!).
 All that hard work you’ve put into your flowerbeds, planters, and patio pots really deserves a spotlight, don’t you think? From candles to strings of light to unique solar light stakes, creative outdoor lighting can turn your patio into a warm and welcoming extension of your living room. And you don’t need to be an electrician to turn on the lights! It’s easy and inexpensive to light up every nook and cranny of your garden and enjoy your yard long past sundown.